How to Set Up Entry Fees
Open the Call Editor and select the Product Editor section.
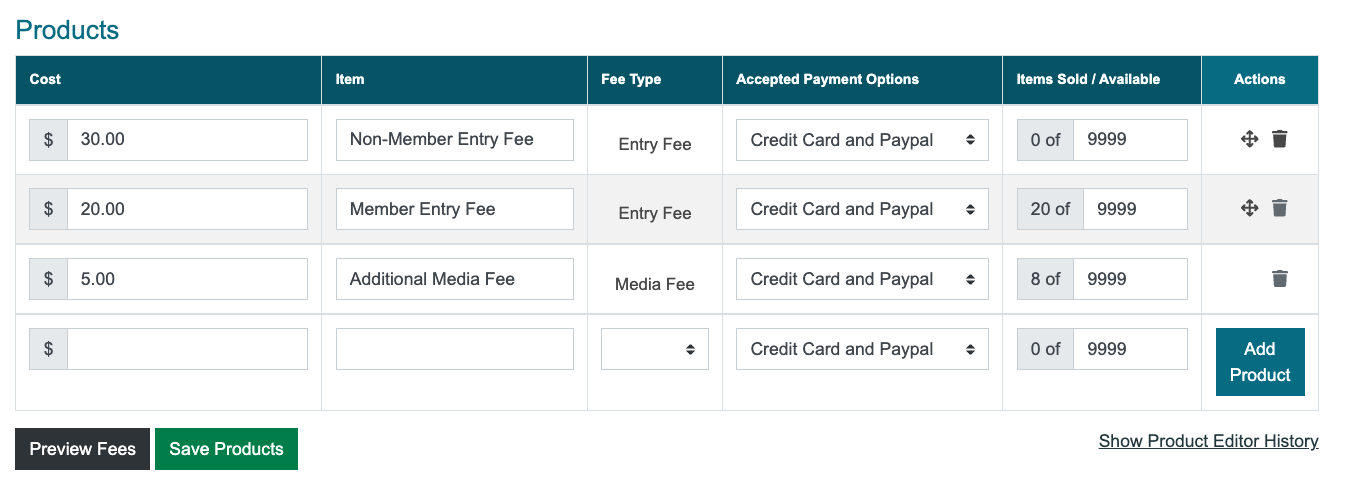
Fill out the empty fields to add your entry fee product(s).
Click the arrow to the left of each filed to view more information.
Cost
Enter the base entry fee or cost to apply. Payments are made in US Dollars only. Enter 0.00 if you don’t charge an entry fee to apply.
Item
Describe what the fee is for (e.g., Art Show Entry Fee).
Fee Type
Choose the applicable fee type for your product (see the options below).
Accepted Payment Options
Choose Credit Card (Visa/ MC) and Paypal, Check, or All to select how artists can pay their fees. Credit card transactions are processed by CaFÉ. For payment by check, you must provide a mailing address on the Product Editor page.
Items Sold/Available
Keep the available quantity at 9,999 to accept an unlimited number of transactions. Decrease the available quantity if you need to lower the cap on the number of applicants.
⚠️ Important: Choose the correct Fee Type.
Entry Fee: Required product that artists must purchase in order to submit their entry. If you do not charge an entry fee, set your cost to $0.00. Add no more than two entry fees.
Media Fee: Media fee will be applied toward each additional work sample above the minimum work sample requirement (e.g., $10 for 1 minimum work sample, $5 for each additional work sample up to the maximum). Available for Scoring by Art (Jury by Artwork) calls only.
Admin: Optional product available for purchase at the same time as the entry fee (e.g. color catalog).
Other: Only to be used with the Confirmation Deadline feature. Enter the cost of the participation fee that invited artists must purchase by the confirmation deadline.
3. Verify the product details and save changes.
Click Add Product to save changes and add the fee to your list of products.
Click the move icon and drag the product to change the order the products will appear on the checkout page.
Note: Only products of the same fee type can be reordered.
Click the trash 🗑️ icon to delete existing products. Note: Products cannot be deleted once purchased.
Click Save Products 💾 to save changes made to your products.
4. If you accept check payments, enter your Mailing Address 📫.
Click Save Mailing Address to save changes.
Applicants will enter the check number on the checkout page and mail it to this address. Their application will be moved to the Awaiting Payment by Check status.
⚡TIP: Click Preview Fees to see how your products will appear on the Call Details page.
How to Create Coupons
Open the Coupon Manager.
Go to the Product Editor and click Create Coupon, OR
Select Events, then Coupons from the left-hand menu.
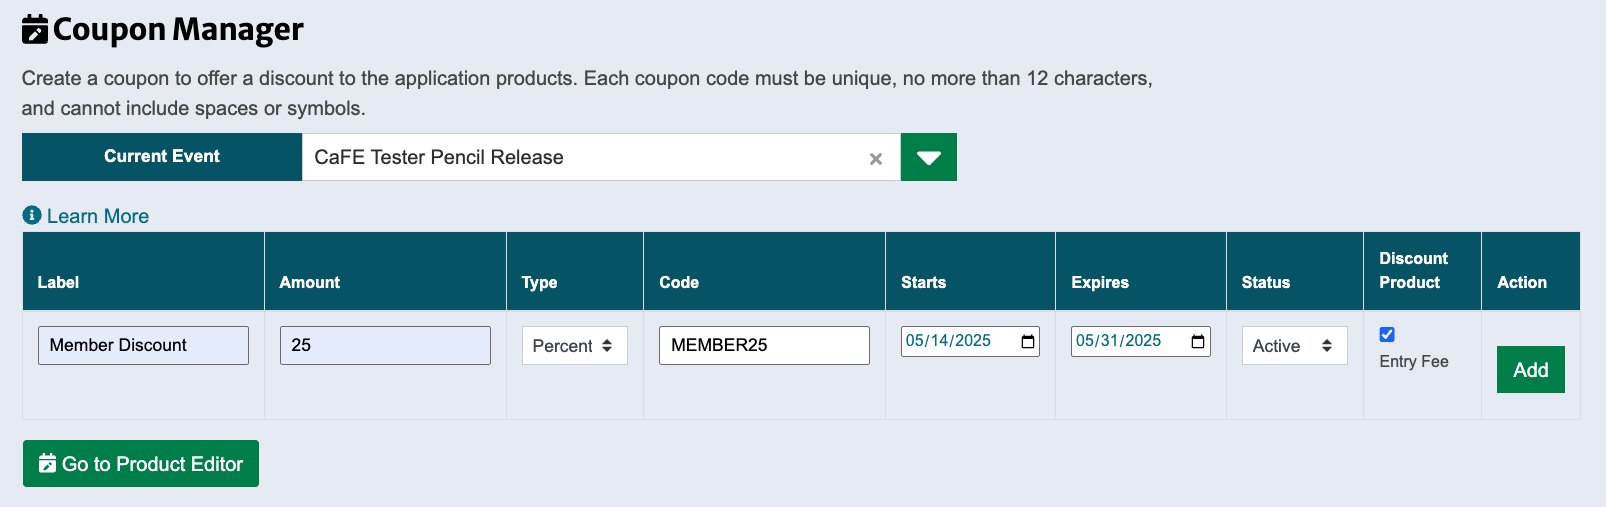
2. Fill out the empty fields to add your coupon details.
Each coupon code must be unique, 4-12 characters long, and cannot include spaces or symbols.
The coupon can discount the cost of the product by a percentage or a set dollar amount.
Coupon codes may start at any time that your application is open and expire on the selected date at 11:59 p.m. in the time zone set in the Call Editor.
Click the arrow to the left of each field type to view more information.
Label
Enter a label that will only be seen internally to describe the purpose of the coupon.
Amount
Enter the amount (dollar or percentage) of the discount.
Type
Choose the type of discount for your coupon (dollar or percent).
Code
Enter the coupon code that applicants will enter on the checkout page. Each coupon code must be unique, 4-12 characters long, and cannot include spaces or symbols.
Starts
Set the starting date your coupon code can be used.
Expires
Set the date your coupon code will expire. Coupon codes expire on the date you select at 11:59 p.m. Mountain Time.
Status
Set the status to Active to allow applicants to use the coupon code between the selected Start and Expiration dates. If set to Inactive, applicants will not be able to use the coupon code.
Discount Product
Choose the product(s) you want to discount (e.g., Entry Fee or Additional Media Fee). The products match the item names listed in the product editor. Note: Discounts to the Media Fee type will be applied to the overall media fee total, not each number of media fees purchased.
3. Verify the coupon details and save changes.
Click Add to save the coupon details and add it to your list of coupons.
Click Save 💾 to save changes to existing coupons.
Click Go to Product Editor to view a read-only list of your coupons.